Friday, 27 March 2015

FYP2 - Week 7

WHY USING SOLENOID?


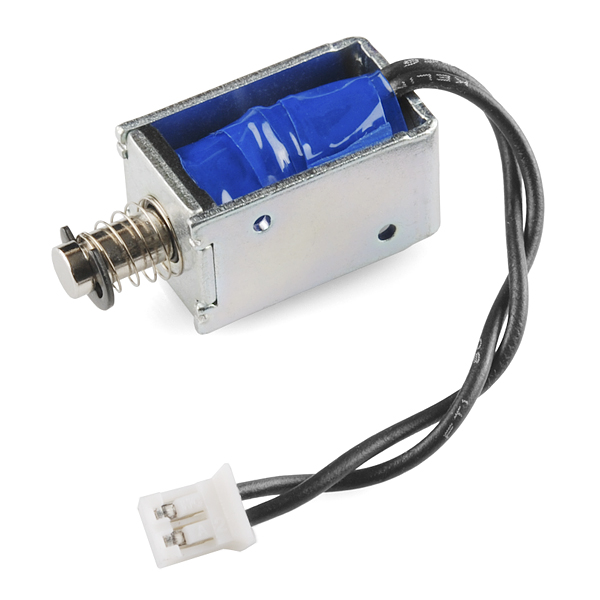
Solenoids are basically electromagnets: they are made of a big coil of copper wire with an armature (a slug of metal) in the middle. When the coil is energized, the slug is pulled into the center of the coil. This makes the solenoid able to pull from one end.

This solenoid in particular is nice and strong, and has a slug with a slanted cut and a good mounting bracket. It's basically an electronic lock, designed for a basic cabinet or safe or door. Normally the lock is active so you can't open the door because the solenoid slug is in the way. It does not use any power in this state. When 9-12VDC is applied, the slug pulls in so it doesn't stick out anymore and the door can be opened.

The solenoids come with the slanted slug as shown above, but you can open it with the two Phillips-head screws and turn it around so its rotated 90, 180 or 270 degrees so that it matches the door you want to use it with.

You will need a fairly good power supply to drive a solenoid, as a lot of current will rush into the solenoid to charge up the electro-magnet, about 500mA, so don't try to power it with a 9V battery!


TECHNICAL DETAILS
  • 24 DC operation (you can use 9-24 DC volts, but lower voltage results in weaker/slower operation)
  • Push or pull type with 5.5 mm throw
  • DC coil resistance: 100 ohms
  • 5 Newton starting force (24VDC)
  • 1.4 oz / 39 grams


When an electrical current is passed through the coils windings, it behaves like an electromagnet and the plunger, which is located inside the coil, is attracted towards the centre of the coil by the magnetic flux setup within the coils body, which in turn compresses a small spring attached to one end of the plunger. The force and speed of the plungers movement is determined by the strength of the magnetic flux generated within the coil.

When the supply current is turned “OFF” (de-energised) the electromagnetic field generated previously by the coil collapses and the energy stored in the compressed spring forces the plunger back out to its original rest position. This back and forth movement of the plunger is known as the solenoids “Stroke”, in other words the maximum distance the plunger can travel in either an “IN” or an “OUT” direction, for example, 0 – 30mm.


Linear solenoids are useful in many applications that require an open or closed (in or out) type motion such as electronically activated door locks, pneumatic or hydraulic control valves, robotics, automotive engine management, irrigation valves to water the garden and even the “Ding-Dong” door bell has one. They are available as open frame, closed frame or sealed tubular types.
Thursday, 12 March 2015

FYP2 - Week 6

TESTING CONTROLED LED AS SOLENOID IN ARDUINO WEB SERVER 


I wanted to investigate controlling the digital outputs on a Arduino from a webpage so I decided to build a simple setup to Turn a LED on and off from a webpage. For this project I used the Arduino Uno R3 and Arduino Ethernet Shield.


First off we need to configure the web server  this is done by calling the Ethernet libraries, setting the Mac Address, IP Address and Server Port. then in the Void Setup you start the server and define the pin you want to plug the LED into.

#include <SPI.h>
#include <Ethernet.h>

byte mac[] = { 0xDE, 0xAD, 0xBE, 0xEF, 0xFE, 0xED };
IPAddress ip(192,168,0, 2);

EthernetServer server(80);

void setup()
{
Serial.begin(9600);
pinMode(8, OUTPUT);
Ethernet.begin(mac, ip);
server.begin();

}

In the Void Loop we define client then check that the web server is connected and available the get it to display some HTML. The first lot checks the status of pin 8 and prints HTML to tell us if the LED is currently turned on or off. Then we use a HTML form to make some radio buttons and a submit button to select the status on or off.

if (digitalRead(8)){
client.print(” LED is <font color=’green’>ON</font>”);
}else{
client.print(” LED is <font color=’red’>OFF</font>”);
}
client.println(“<br />”);

client.print(“<FORM action=\”http://192.168.1.177/\” >”);
client.print(“<P> <INPUT type=\”radio\” name=\”status\” value=\”1\”>ON”);
client.print(“<P> <INPUT type=\”radio\” name=\”status\” value=\”0\”>OFF”);
client.print(“<P> <INPUT type=\”submit\” value=\”Submit\”> </FORM>”);

break;

}

Now all that is left is to read the input from the HTML Form and turn the led on or off. When you select one of the radio buttons and click submit the form adds a status=1 or status=0 to the end of the URL. We can now use the GET function to read the value and run through am IF statement to set the digital write on pin 8 to either High or Low (On or Off).

if (c == ‘\n’) {

currentLineIsBlank = true;
buffer=”";
} else if (c == ‘\r’) {
if(buffer.indexOf(“GET /?status=1″)>=0)
digitalWrite(8,HIGH);

if(buffer.indexOf(“GET /?status=0″)>=0)
digitalWrite(8,LOW);
}

else {
After create HTML form, the web server will look like this

Before click the on LED

After click the ON the LED in red led


Wednesday, 4 March 2015

FYP2 - Week 5

Briefing #1 FYP2 Degree

The briefing is about to give some explanation for the students who are taking the Final Year Project for Diploma and Degree programmed. The briefing is about:
  •  Introduction
  • Objectives
  • Credits and duration
  • Scope of projects
  • Title selection
  • Project Assessment
  • Presentation day
  •  Submission date of project